
According to phpMyAdmin’s official site, phpMyAdmin is a free software tool written in PHP, intended to handle the administration of MySQL over the Web. phpMyAdmin supports a wide range of operations on MySQL and MariaDB.
phpMyAdmin is an open source tool written in php and is used for administration of MySQL and MariaDB. phpMyAdmin provides a very simple and intuitive user interface to accomplish these tasks.
Installing phpMyAdmin
To install phpMyAdmin, LAMP (Linux, Apache, MySQL and PHP stack) server must be installed on your Desktop/Server. If you haven’t installed LAMP yet, you can follow our tutorial on How to Install LAMP Server on Ubuntu 16.04/17.04 Desktop Using Tasksel.
Before we begin with installation, it is good if we update the list of available packages by running following commond.
sudo apt-get update
Once the lists are updated and upgrades are done (if there are any available), then run following command to install install phpMyAdmin.
sudo apt-get install phpmyadmin

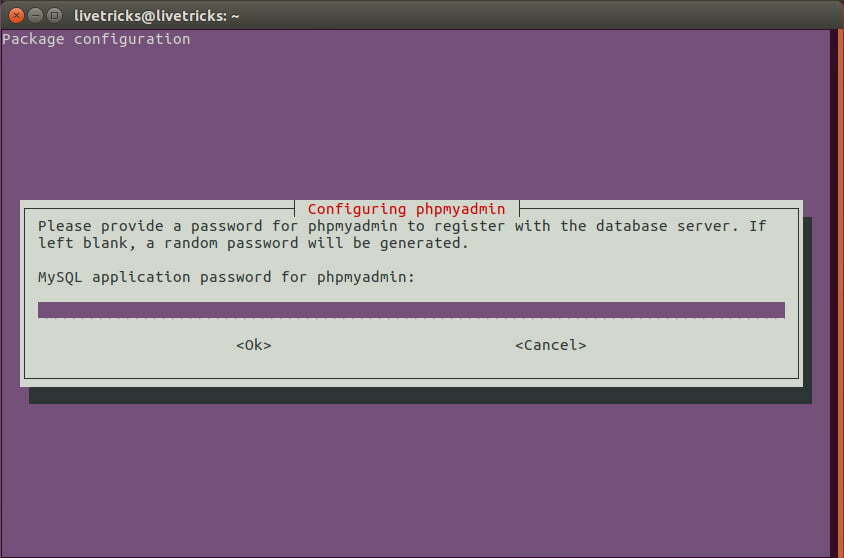
It will ask to configure database, select Yes and hit Enter. Then it will prompt you to enter the password to register phpMyAdmin with database server, enter the desired password and confirm it in the next prompt.

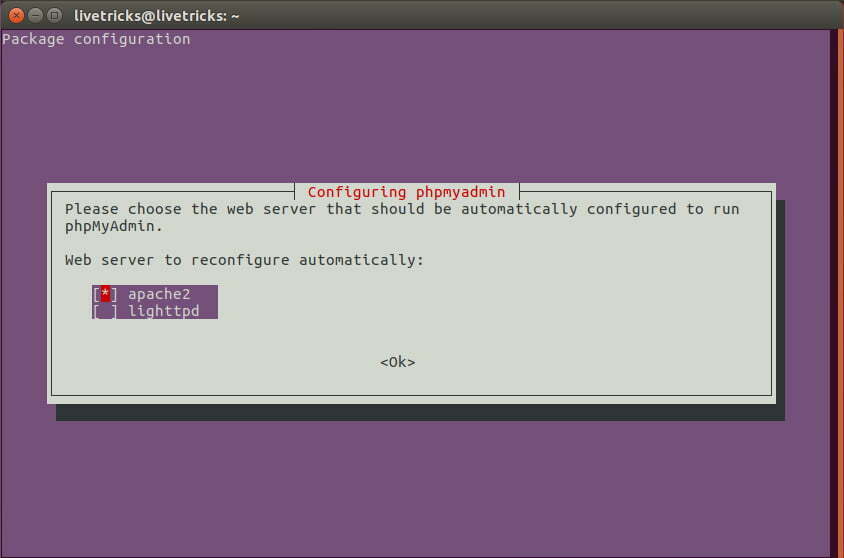
After confirming the password, the next prompt will be for selecting web server, move cursor to apache2 using arrow keys and press spacebar to select it, press tab to move the curser to ok, and hit enter.
Restart Apache using below command
sudo service apache2 restart
or
sudo /etc/init.d/apache2 restart
And you are done, now you can access phpMyAdmin by visiting http://localhost/phpmyadmin in your web browser.
kamagra pas cher: achat kamagra – Kamagra oral jelly pas cher
donde comprar xenical sin receta en espa̱a: Confia Pharma Рfarmacia veterinaria online barata
t̩tine avent natural 2: Pharmacie Express Рotite traitement sans ordonnance
infection intestinale traitement sans ordonnance: acheter cialis 20 mg Рviagra g̩n̩rique sans ordonnance en pharmacie
se puede comprar mirtazapina sin receta: puedo comprar pregabalina sin receta – farmacia en casa online s.l., madrid
la loratadina se puede comprar sin receta: Confia Pharma – lorazepam comprar sin receta
penna insulina toujeo: tachipirina fiale intramuscolo – lidocaina intramuscolo
̩quivalent viagra homme: m̩dicament pour le stress avec ordonnance Рanti depresseur sans ordonnance
test infection urinaire pharmacie sans ordonnance fucidine sans ordonnance en pharmacie kamagra sans ordonnance en pharmacie
mГ©dicaments pour le stress sans ordonnance: kelual ds shampooing – traitement otite sans ordonnance pharmacie
sildenafil teva prezzo: orasiv polvere – forbest aerosol prezzo
https://pharmacieexpress.com/# peut on aller en pharmacie de garde sans ordonnance
heliocare farmacia online farmacia ferrol online farmacia online mascarillas fp2
pillola cerazette prezzo: Farmacia Subito – farmacia online senza spese spedizione
equivalent lumirelax sans ordonnance: Pharmacie Express – ordonnance medical
ovison soluzione cutanea prezzo voltaren fiale prezzo la farmacia online piГ№ economica
peut on aller chez l’orl sans ordonnance: ketum gel – remede cystite sans ordonnance
codeisan comprar sin receta: cupon promocional farmacia en casa online – donde comprar pastillas anticonceptivas sin receta
http://farmaciasubito.com/# sconti farmacia online
farmacia clemente Farmacia Subito ausilium miao
test clamidia farmacia: tebarat collirio a cosa serve – ovaleap 900 prezzo
colecalciferolo 50000: control farmaco – microser prezzo
farmacia online en badajoz comprar relajante muscular sin receta farmacia online mataro
https://farmaciasubito.shop/# synapsine 1000 a cosa serve
ozempic otc mexico: the online drug store – prednisone over the counter in mexico
india online pharmacy international shipping aster pharmacy india retail pharmacy market in india
online pharmacy usa: Pharm Mex – mexican tramadol
mexican pharmacy cozumel: can you get adderall at a mexican pharmacy? – medicines online shopping
rx solutions pharmacy Pharm Express 24 online pharmacy no prescription needed lortab
https://pharmexpress24.shop/# online pharmacy reviews cialis
india pharmacy reviews: b pharmacy salary in india – generic cialis india pharmacy
pharmacy chains in india: india pharmacy international shipping – pharmacy education in india
pharmacy meds online affordable meds rx mexican pharmacy amoxicillin
india prescription drugs: medplus pharmacy india – compounding pharmacy in india
mexico pharmacies: pharmacy in mexico online – reliable mexican pharmacy
best online pharmacy percocet Pharm Express 24 mexican pharmacies shipping to usa
finasteride 1 mg online pharmacy: topamax prices pharmacy – publix pharmacy doxycycline
http://inpharm24.com/# medlife pharmacy
rx pharmacy coupons review: Pharm Express 24 – no rx needed pharmacy
pharmacies in mexico that ship to the us: Pharm Mex – mexican pharmacy doctor mascot
online medical store india: ozempic india pharmacy – best online indian pharmacy
viagra us pharmacy: Pharm Express 24 – online pharmacy ventolin
medicine from india: e pharmacy in india – indian pharmacy
doctor of pharmacy india: meds from india – pharmacy in india
online drugstore free shipping mexican drugstore best mexican online pharmacy
target pharmacy nexium: united pharmacy finpecia – baclofen inhouse pharmacy
polish pharmacy online usa: ventolin inhaler inhouse pharmacy – online pharmacy scams
value generic pharmacy adipex viagra from usa pharmacy trusted online pharmacy viagra
http://inpharm24.com/# india pharmacy delivery
prescription medication online pharmacy: mexican pharmacy that ships to the us – buy pain killer online
india pharmacy cialis: indian online pharmacy – history of pharmacy in india
pain relief: Pharm Express 24 – national pharmacies
first online pharmacy in india InPharm24 medlife pharmacy
india online medicine: pharmacy chains in india – doctor of pharmacy india
testosterone mexican pharmacy: bactrim mexican pharmacy – mexico prescriptions
п»їlipitor copay card participating pharmacy online pharmacy group nearest pharmacy store
https://pharmexpress24.com/# Cytoxan
what does mexican ritalin look like: mexico’s pills – is mounjaro mexico pharmacy legit
rx pharmacy plus: accutane online pharmacy india – levaquin online pharmacy
india online pharmacy: pharmacy store in india – career after b pharmacy in india
online pharmacy india ship to usa: InPharm24 – list of pharmacies in india
https://inpharm24.com/# online pharmacy app developer in india
pharmacy names in india india online pharmacy online medicine india
pfizer 100mg viagra: VGR Sources – how can i get sildenafil prescription online
sildenafil australia: viagra brand canada – where can i buy viagra online in canada
purchase viagra 100mg: how to buy viagra online without prescription – sildenafil 100 capsules
buy online viagra pills mexico viagra prices how much is female viagra pill
viagra discount: prescription viagra online canada – canadian pharmacy viagra no prescription
buy viagra australia online: female viagra where to buy – order viagra 100mg online
where to buy viagra in singapore: sildenafil from mexico – viagra online from utah
https://vgrsources.com/# sildenafil 100mg tablets for sale
how much is a viagra prescription [url=https://vgrsources.com/#]VGR Sources[/url] us pharmacy viagra prices
viagra 10mg price in india: canadian pharmacy generic viagra 100mg – 100mg viagra pill
cost of viagra prescription: viagra soft 100mg online canadian pharmacy – generic viagra – mastercard
how to buy viagra without prescription: VGR Sources – viagra gel in india
how much is viagra in canada: VGR Sources – viagra 100mg tablet
order viagra online canadian pharmacy VGR Sources can you buy female viagra
where to buy female viagra canada: VGR Sources – viagra canadian pharmacy prices
female viagra tablets uk: VGR Sources – viagra 100 mg tablet price
sildenafil 150 mg: VGR Sources – viagra non prescription
viagra generic soft tab VGR Sources generic sildenafil no prescription
viagra us: VGR Sources – sildenafil buy cheap
https://vgrsources.com/# viagra online canadian pharmacy paypal
viagra purchase australia: online sildenafil – can you buy generic viagra uk
sildenafil buy cheap: VGR Sources – where can i buy viagra over the counter in usa
sildenafil uk pharmacy can i buy viagra otc cost of 1 viagra pill
prescription female viagra: VGR Sources – buy real viagra from canada
viagra 100mg buy online india: VGR Sources – where can you get female viagra pills
viagra medicine in india: VGR Sources – viagra for sale over the counter
buy viagra online australia fast delivery VGR Sources buy viagra online no prescription
genuine viagra: how can i get viagra over the counter – how to order viagra online
where can you purchase female viagra: where to order cheap viagra – sildenafil 1mg
https://vgrsources.com/# sildenafil canada over the counter
cost of 50mg viagra in canada: buy viagra no rx – buy viagra with prescription
buy sildenafil in mexico 200mg sildenafil soft gel capsule can you purchase viagra in mexico
where can you buy viagra over the counter: sildenafil 100 mg – where can i get viagra uk
otc viagra australia: VGR Sources – generic viagra from us
female viagra pill online: VGR Sources – viagra discount
https://vgrsources.com/# viagra fast shipping
viagra price comparison how much is viagra over the counter buy canadian sildenafil
viagra mail order: VGR Sources – viagra best price
cheap viagra australia fast delivery: buy viagra pills online in india – viagra lowest price canada
can i buy over the counter viagra: VGR Sources – cheap over the counter viagra
viagra 125 mg: VGR Sources – female viagra online order
female viagra 100mg tablet price in india VGR Sources viagra no prescription
sildenafil generic brand name: buy generic viagra 100mg online – canadian rx viagra
Viagra 50mg: VGR Sources – generic viagra online purchase
https://vgrsources.com/# viagra online safe
buy viagra paypal: VGR Sources – buy viagra online without a prescription
buy viagra over the counter usa where can i buy cheap generic viagra online viagra soft generic
sildenafil 110 mg: canada generic sildenafil – generic sildenafil 50 mg
purchase viagra: best sildenafil pills – viagra 100mg tablet
sildenafil 100mg price australia: VGR Sources – where to buy cheap viagra in canada
https://vgrsources.com/# where to get viagra
30 mg sildenafil chewable VGR Sources viagra pills online india
zetia and lipitor together: Generic Lipitor fast delivery – Discreet shipping for Lipitor
Predni Pharm: PredniPharm – Predni Pharm
what not to take with crestor: Crestor Pharm – CrestorPharm
Crestor Pharm Buy cholesterol medicine online cheap can crestor cause diarrhea
No prescription diabetes meds online: how does rybelsus work for diabetes – rybelsus saving card
CrestorPharm: crestor mental side effects – CrestorPharm
PredniPharm: PredniPharm – PredniPharm
https://semaglupharm.com/# SemagluPharm
prednisone 20 mg purchase PredniPharm prednisone 10 mg coupon
purchase prednisone canada: Predni Pharm – 40 mg daily prednisone
No prescription diabetes meds online: weight watchers semaglutide cost without insurance – SemagluPharm
how to get prednisone tablets: prednisone 10 mg over the counter – Predni Pharm
PredniPharm: Predni Pharm – purchase prednisone canada
SemagluPharm what is the dark side of semaglutide? Rybelsus side effects and dosage
semaglutide bloating semaglutide para que sirve Semaglu Pharm
prednisone steroids: prednisone buy canada – buy prednisone canada
prednisone in mexico generic prednisone 10mg PredniPharm
https://prednipharm.shop/# Predni Pharm
CrestorPharm: CrestorPharm – Crestor Pharm
CrestorPharm: cost of rosuvastatin 10mg without insurance – Crestor Pharm
atorvastatin with or without food: LipiPharm – FDA-approved generic statins online
Generic Lipitor fast delivery LipiPharm LipiPharm
can i take berberine and semaglutide together: semaglutide depression – SemagluPharm
LipiPharm: LipiPharm – LipiPharm
can you crush atorvastatin: Lipi Pharm – No RX Lipitor online
order prednisone with mastercard debit online prednisone 5mg Predni Pharm
http://lipipharm.com/# half life of atorvastatin
Lipi Pharm: FDA-approved generic statins online – which is better lipitor or crestor
SemagluPharm: semaglutide before and after 3 months – cheapest semaglutide without insurance
CrestorPharm Crestor Pharm Crestor Pharm
http://semaglupharm.com/# oral semaglutide side effects
USA-based pharmacy Lipitor delivery: Online statin drugs no doctor visit – п»їBuy Lipitor without prescription USA
buying prednisone: average cost of prednisone – purchase prednisone 10mg
Atorvastatin online pharmacy atorvastatin 80 mg pill identifier Lipi Pharm
No RX Lipitor online: para que sirve atorvastatin 40 mg – LipiPharm
CrestorPharm: alternatives to crestor – rosuvastatin hair loss
crestor side effects alcohol Crestor Pharm CrestorPharm
Predni Pharm: Predni Pharm – prednisone oral
https://crestorpharm.shop/# No doctor visit required statins
Safe atorvastatin purchase without RX: п»їBuy Lipitor without prescription USA – LipiPharm
Online pharmacy Rybelsus: SemagluPharm – SemagluPharm
http://semaglupharm.com/# Semaglu Pharm
Lipi Pharm Affordable Lipitor alternatives USA is atorvastatin bad for kidneys
where to buy semaglutide: SemagluPharm – Semaglu Pharm
Lipi Pharm: Discreet shipping for Lipitor – Lipi Pharm
https://semaglupharm.com/# SemagluPharm
https://prednipharm.shop/# 1 mg prednisone cost
Lipi Pharm: USA-based pharmacy Lipitor delivery – Lipi Pharm
No prescription diabetes meds online Rybelsus for blood sugar control Safe delivery in the US
https://semaglupharm.shop/# Online pharmacy Rybelsus
atorvastatin 80 mg pill identifier: LipiPharm – FDA-approved generic statins online
Semaglu Pharm: Semaglu Pharm – No prescription diabetes meds online
LipiPharm LipiPharm köp lipitor
http://semaglupharm.com/# SemagluPharm
atorvastatin 10mg tab: LipiPharm – Lipi Pharm
stopping rosuvastatin side effects: does crestor cause weight gain – rosuvastatin 40 mg uses
https://semaglupharm.com/# SemagluPharm
PredniPharm PredniPharm PredniPharm
SemagluPharm: how to get semaglutide prescription – Semaglu Pharm
SemagluPharm: compounded semaglutide side effects – Semaglu Pharm
http://semaglupharm.com/# SemagluPharm
is lipitor and atorvastatin the same LipiPharm Safe atorvastatin purchase without RX
http://lipipharm.com/# lipitor for stroke
Semaglu Pharm: semaglutide insurance coverage – rybelsus bioavailability
http://semaglupharm.com/# SemagluPharm
Semaglu Pharm: semaglutide oral vs injection – SemagluPharm
Crestor Pharm Crestor Pharm CrestorPharm
Semaglu Pharm: п»їBuy Rybelsus online USA – tirzepatide vs rybelsus
https://semaglupharm.shop/# SemagluPharm
CrestorPharm: No doctor visit required statins – Crestor Pharm
does crestor reduce calcium score crestor and insomnia CrestorPharm
https://crestorpharm.com/# rosuvastatin and thc
does rosuvastatin cause anxiety: Crestor Pharm – CrestorPharm
https://semaglupharm.com/# SemagluPharm
Semaglu Pharm Semaglu Pharm Semaglu Pharm
https://semaglupharm.shop/# Semaglutide tablets without prescription
LipiPharm: Safe atorvastatin purchase without RX – LipiPharm
prednisone brand name in usa: prednisone for dogs – prednisone brand name us
LipiPharm LipiPharm LipiPharm
http://semaglupharm.com/# SemagluPharm
prednisone over the counter uk: PredniPharm – PredniPharm
https://semaglupharm.shop/# SemagluPharm
CrestorPharm: Crestor Pharm – Over-the-counter Crestor USA
SemagluPharm Semaglutide tablets without prescription Order Rybelsus discreetly
https://semaglupharm.com/# Semaglu Pharm
prednisone buying: buy generic prednisone online – Predni Pharm
LipiPharm: LipiPharm – Affordable Lipitor alternatives USA
Predni Pharm prednisone for sale online where can i buy prednisone online without a prescription
https://canadapharmglobal.com/# best canadian pharmacy to order from
India Pharm Global: top 10 pharmacies in india – india online pharmacy
https://indiapharmglobal.com/# india online pharmacy
India Pharm Global: indian pharmacy paypal – India Pharm Global
Meds From Mexico buying prescription drugs in mexico online Meds From Mexico
http://indiapharmglobal.com/# India Pharm Global
indian pharmacies safe: India Pharm Global – India Pharm Global
buying from online mexican pharmacy: Meds From Mexico – buying from online mexican pharmacy
https://indiapharmglobal.shop/# India Pharm Global
medicine in mexico pharmacies mexico drug stores pharmacies Meds From Mexico
reputable indian online pharmacy: india pharmacy mail order – india pharmacy
Meds From Mexico: buying from online mexican pharmacy – Meds From Mexico
https://canadapharmglobal.com/# canadian pharmacy prices
Meds From Mexico purple pharmacy mexico price list buying from online mexican pharmacy
top 10 online pharmacy in india: п»їlegitimate online pharmacies india – india online pharmacy
medication from mexico pharmacy: mexican border pharmacies shipping to usa – Meds From Mexico
https://canadapharmglobal.shop/# canadianpharmacy com
cheapest online pharmacy india india pharmacy mail order India Pharm Global
https://canadapharmglobal.com/# legal to buy prescription drugs from canada
mexican drugstore online: Meds From Mexico – mexico drug stores pharmacies
https://medsfrommexico.com/# buying from online mexican pharmacy
safe reliable canadian pharmacy: canadian pharmacy checker – canadian pharmacy store
mexican drugstore online reputable mexican pharmacies online Meds From Mexico
pharmacies in mexico that ship to usa: Meds From Mexico – Meds From Mexico
http://medsfrommexico.com/# Meds From Mexico
purple pharmacy mexico price list: Meds From Mexico – Meds From Mexico
Meds From Mexico best online pharmacies in mexico Meds From Mexico
https://indiapharmglobal.com/# India Pharm Global
https://medsfrommexico.com/# mexican drugstore online
http://svenskapharma.com/# rea proteinbars
https://raskapotek.shop/# Rask Apotek
https://efarmaciait.shop/# farmacia spedizioni gratis
https://efarmaciait.shop/# EFarmaciaIt
https://papafarma.com/# cuando hace efecto el movicol
https://efarmaciait.shop/# EFarmaciaIt
http://pharmaconnectusa.com/# PharmaConnectUSA
http://pharmaconfiance.com/# Pharma Confiance
https://medicijnpunt.shop/# Medicijn Punt
https://pharmaconnectusa.shop/# PharmaConnectUSA
https://pharmajetzt.com/# Pharma Jetzt
https://pharmajetzt.shop/# PharmaJetzt
https://pharmaconnectusa.com/# online pharmacy cialis uk
https://pharmaconnectusa.shop/# non prescription medicine pharmacy
https://medicijnpunt.shop/# digitale apotheek
http://pharmajetzt.com/# pille kaufen apotheke
Гороскоп http://istoriamashin.ru/ .
dragon link slots online real money dragon link slots online real money .
http://www.infinitymugenteam.com:80/infinity.wiki/mediawiki2/index.php/User:Alberto97R
Pharma Jetzt versand apotheke online Pharma Jetzt
pharmacy cialis online: quality rx pharmacy – PharmaConnectUSA
https://awaker.info/home.php?mod=space&uid=7334308&do=profile&from=space
https://wikigranny.com/wiki/index.php/User:FlynnVirgin29
https://myspace.com/widmarmorita900
http://forum.artefakt.cz//profile.php?id=909087
https://en.encyclopedia.kz/index.php/User:OliviaPlt452268
http://www.zian100pi.com/discuz/home.php?mod=space&uid=1450041&do=profile&from=space
https://www.pipeworks.wiki/index.php/User:JonnaBsq51369
https://openequity.ai/wiki/index.php/User:DinahB4988068
http://medicijnpunt.com/# MedicijnPunt
https://bbs.flashdown365.com/home.php?mod=space&uid=3142785&do=profile&from=space
https://40th.jiuzhai.com/space-uid-3582709.html
medicijnen kopen online: bestellen apotheek – wat is mijn apotheek
https://documentacion.conarpesa.com.ar/index.php?title=Usuario:HalinaHilyard79
Pharma Connect USA: PharmaConnectUSA – online pharmacy prednisone
https://wikirefuge.lpo.fr/index.php?title=Utilisateur:BruceCram34655
http://forum2.isky.hk/home.php?mod=space&uid=133655&do=profile&from=space
https://bbarlock.com/index.php/User:CarolinePrichard
Medicijn Punt Medicijn Punt Medicijn Punt
https://dirtydeleted.net/index.php/User:CecilDaz33697080
Pharma Jetzt: medikamente.de – PharmaJetzt
amoxicilline et ibuprofГЁne: farmГЎcia – pharmacie pegot
http://pharmaconfiance.com/# Pharma Confiance
https://5.135.151.46/home.php?mod=space&uid=10204418&do=profile
https://freekoreatravel.com/index.php/User:DeliaLane6
https://mediawiki.inrisk.com.ua/wiki/User:SheldonDow3
https://xn--cksr0ar36ezxo.com/home.php?mod=space&uid=330795&do=profile&from=space
http://wiki.naval.ch/index.php?title=Benutzer:PrinceRoof
https://pigeon.bdfort.com/author/robbiefairc
https://idpedia.wiki/index.php/User:DongMortensen0
PharmaJetzt: Pharma Jetzt – Pharma Jetzt
https://iti.vnu.edu.vn/mediawiki/index.php?title=Th%C3%A0nh_vi%C3%AAn:NovellaTrommler
http://fengin.cn/member.asp?action=view&memName=ThurmanJ3569991712
https://pharmaconnectusa.com/# Nortriptyline
PharmaJetzt shop apotheke versandkostenfrei PharmaJetzt
https://mediawiki.novastega.me/index.php/User:PPCMaybelle
PharmaJetzt: apotrke – Pharma Jetzt
https://reviews.wiki/index.php/User:Bernice59P
https://thebitcoinproject.club/wiki/index.php/User:LamarWhitney25
http://pharmaconnectusa.com/# online pharmacy anabolic steroids
https://dev.aeywoo.com/index.php/User:StaceyQuintana5
https://troonindex.com/index.php/User:MiriamGil812329
https://wiki.eqoarevival.com/index.php/User:KianP94761527
https://wiki.anythingcanbehacked.com/index.php?title=User:AmadoMoffett55
https://inspo.wiki/index.php/User:DeneenCallender
http://www.zerobywtar.com/space-uid-3822214.html
https://oeclub.org/index.php/User:JanLake697551
https://eet3122salainf.sytes.net/mediawiki/index.php?title=Usuario:EtsukoLansford9
https://www.wiki.azerothsentinels.com/index.php/User:AnnetteMmc
http://stephankrieger.net/index.php?title=Benutzer:RitaHairston61
Medicijn Punt: Medicijn Punt – Medicijn Punt
https://wiki.podwapinska.pl/U%C5%BCytkownik:HortenseCrotty6
apothekenversand: Pharma Jetzt – Pharma Jetzt
http://wiki.rascol.net/index.php/Utilisateur:BeulahRollins
https://randyrick.net/index.php/User:AdamEstevez961
https://wiki.internzone.net/index.php?title=Benutzer:BeulahCromwell8
https://eet3122salainf.sytes.net/mediawiki/index.php?title=Usuario:EtsukoLansford9
http://www.p2sky.com/home.php?mod=space&uid=6165051&do=profile
canadian pharmacy king reviews my canadian pharmacy reviews canadian pharmacies online
https://wavedream.wiki/index.php/User:Holly5089467314
http://wiki.die-karte-bitte.de/index.php/Benutzer_Diskussion:ClaribelK33
https://mh.xyhero.com/space-uid-58301.html
https://indimedsdirect.shop/# IndiMeds Direct
IndiMeds Direct: reputable indian pharmacies – IndiMeds Direct
https://presslibrary.wiki/index.php?title=User:AnnetteRankin8
https://wiki.vtcro.org/index.php/User:GenevieveDavies
https://wiki.digitalcare.noho.st/index.php?title=User_talk:HunterMay2
https://indimedsdirect.com/# mail order pharmacy india
certified canadian international pharmacy: canadian drug – canadian pharmacy
https://documentacion.conarpesa.com.ar/index.php?title=Usuario:ConcepcionRoller
cheapest online pharmacy india india pharmacy mail order buy medicines online in india
https://reviews.wiki/index.php/User:EmilieNorfleet0
https://kreosite.com/index.php/User:ShawnaChumley
http://tijuanameds.com/# mexico pharmacies prescription drugs
https://helpdesk-test.zcu.cz/wiki/User_talk:Charles1627
IndiMeds Direct: IndiMeds Direct – IndiMeds Direct
https://ragnafrost.wiki/index.php/Utilizador:RoxannaHartz964
https://nogami-nohken.jp/BTDB/?⑴뵪??HwaLording3
https://inspo.wiki/index.php/User:DeneenCallender
https://xn--kgbec7hm.my/index.php/User:SilkeLionel6303
https://oeclub.org/index.php/User:AdolphWitherspoo
http://www.zerobywtar.com/space-uid-3822214.html
https://bookslibrary.wiki/content/User:AutumnKillough
online pharmacy india: п»їlegitimate online pharmacies india – п»їlegitimate online pharmacies india
https://indimedsdirect.com/# IndiMeds Direct
http://bbs.clxx.vip/home.php?mod=space&uid=229008&do=profile
https://mqbinfo.com/w/User:LeannaFeakes422
https://hubpages.com/@via2025
https://support.ourarchives.online/index.php?title=User:CesarXwf2823
https://wiki.tgt.eu.com/index.php?title=User:Richie6784
world pharmacy india IndiMeds Direct IndiMeds Direct
canadian pharmacy victoza: CanRx Direct – canadian pharmacy
https://thaprobaniannostalgia.com/index.php/User:NicoleBivins131
https://zimeng.zfk123.xyz/home.php?mod=space&uid=161692&do=profile&from=space
https://dirtydeleted.net/index.php/User:CecilDaz33697080
https://kmportal.nha.gov.ph/index.php/User:HassanSouthee74
https://nogami-nohken.jp/BTDB/?⑴뵪??KathrynWestmacot
http://tijuanameds.com/# TijuanaMeds
http://celary.com.pl/index.php/U%C5%BCytkownik:KateBryce08
https://r12imob.store/index.php?page=user&action=pub_profile&id=358716
http://indimedsdirect.com/# Online medicine order
https://higgledy-piggledy.xyz/index.php/User:ClarkYav30
top 10 online pharmacy in india: reputable indian pharmacies – IndiMeds Direct
reputable indian pharmacies online shopping pharmacy india india pharmacy
https://1904lpe.org/wiki/index.php/User:JaymeVillareal5
https://wiki.digitalcare.noho.st/index.php?title=User_talk:LorenL014073
http://indimedsdirect.com/# IndiMeds Direct
canadian pharmacy reviews: trustworthy canadian pharmacy – canada drug pharmacy
buy canadian drugs CanRx Direct canadian pharmacy meds
карниз с электроприводом карниз с электроприводом .
ip камера iflow citadel-trade.ru .
https://indimedsdirect.com/# reputable indian pharmacies
карнизы для штор купить в москве карнизы для штор купить в москве .
https://indimedsdirect.shop/# IndiMeds Direct
https://rxfreemeds.shop/# good pill pharmacy
https://rxfreemeds.shop/# boots pharmacy cialis
https://enclomiphenebestprice.com/# enclomiphene testosterone
http://enclomiphenebestprice.com/# enclomiphene best price
металлические значки на заказ металлические значки на заказ .
https://farmaciaasequible.shop/# fermacia
супер прогнозы на спорт http://www.kompyuternye-prognozy-na-futbol1.ru .
https://enclomiphenebestprice.shop/# enclomiphene for sale
http://rxfreemeds.com/# atacand online pharmacy
http://rxfreemeds.com/# RxFree Meds
https://medismartpharmacy.com/# online pharmacy propecia
электрические карнизы купить http://www.elektrokarnizy750.ru/ .
карниз с приводом elektrokarnizy-dlya-shtor1.ru .
перевод договора на английский https://www.trs-center.ru .
buy prescription drugs from india: IndoMeds USA – mail order pharmacy india
https://indomedsusa.shop/# IndoMeds USA
IndoMeds USA: cheapest online pharmacy india – IndoMeds USA
https://medismartpharmacy.com/# medication costs
online pharmacy ultram pharmacy online shopping usa triamcinolone cream online pharmacy
pharmacy assistant certification online: MediSmart Pharmacy – xenical pharmacy uk
https://indomedsusa.com/# india pharmacy
canadian pharmacy 24: MediSmart Pharmacy – canadian pharmacy world reviews
mexican border pharmacies shipping to usa MexiMeds Express MexiMeds Express
https://indomedsusa.shop/# top 10 pharmacies in india
IndoMeds USA: IndoMeds USA – indian pharmacy
canadian pharmacy meds review: MediSmart Pharmacy – my canadian pharmacy
http://indomedsusa.com/# IndoMeds USA
Продажа напольного покрытия ДекорЭкспо http://laminat2.ru .
us online pharmacy generic viagra online premarin pharmacy coupon
https://meximedsexpress.com/# medicine in mexico pharmacies
indian pharmacy paypal: india pharmacy – IndoMeds USA
my canadian pharmacy: cialis mail order pharmacy – canada drugs online review
http://meximedsexpress.com/# mexican pharmaceuticals online
MexiMeds Express mexico drug stores pharmacies MexiMeds Express
IndoMeds USA: reputable indian pharmacies – IndoMeds USA
global pharmacy canada: bupropion sr pharmacy – rate canadian pharmacies
http://meximedsexpress.com/# buying prescription drugs in mexico online
http://indomedsusa.com/# IndoMeds USA
MexiMeds Express buying prescription drugs in mexico online mexican rx online
kroger pharmacy lisinopril: inhouse pharmacy general motilium – bupropion target pharmacy
Магазин паркетной доски в Москве, нахимовский проспект 24. http://www.parketnay-doska2.ru/ .
canada pharmacy reviews: MediSmart Pharmacy – canadian pharmacy checker
https://meximedsexpress.com/# MexiMeds Express
mexican rx online mexico pharmacies prescription drugs mexican online pharmacies prescription drugs
MexiMeds Express: MexiMeds Express – MexiMeds Express
https://indomedsusa.shop/# IndoMeds USA
canadian pharmacy online store: MediSmart Pharmacy – canadian drug prices
http://meximedsexpress.com/# mexico pharmacies prescription drugs
world pharmacy rx MediSmart Pharmacy mexican online mail order pharmacy
IndoMeds USA: top 10 online pharmacy in india – reputable indian pharmacies
wan aks byt thmyl [url=www.arabic1xbet.com]wan aks byt thmyl[/url] .
https://medismartpharmacy.shop/# lexapro pharmacy assistance
Инженерный паркет купить в Москве https://www.inzenernay-doska1.ru .
IndoMeds USA: world pharmacy india – world pharmacy india
IndoMeds USA IndoMeds USA IndoMeds USA
https://medismartpharmacy.shop/# singulair pharmacy prices
mexico pharmacies prescription drugs: medicine in mexico pharmacies – MexiMeds Express
best india pharmacy IndoMeds USA buy prescription drugs from india
https://medismartpharmacy.shop/# uf pharmacy online refill
https://medismartpharmacy.shop/# masters in pharmacy online
проект реконструкции квартиры проект реконструкции квартиры .
трансформатор тмг трансформатор тмг .
узи прибор kupit-uzi-apparat8.ru .
flagyl online pharmacy: isotretinoin pharmacy – celebrex northwest pharmacy
value rx pharmacy MediSmart Pharmacy xeloda specialty pharmacy alliance
https://indomedsusa.shop/# IndoMeds USA
купить новый узи аппарат https://kupit-uzi-apparat9.ru/ .
Mobic: MediSmart Pharmacy – does tesco pharmacy sell viagra
MexiMeds Express mexican pharmaceuticals online pharmacies in mexico that ship to usa
https://indomedsusa.shop/# IndoMeds USA
https://medismartpharmacy.shop/# which pharmacy is cheaper
wellbutrin people’s pharmacy: MediSmart Pharmacy – kamagra oral jelly
http://meximedsexpress.com/# mexican mail order pharmacies
mexico pharmacies prescription drugs MexiMeds Express mexican online pharmacies prescription drugs
https://indomedsusa.com/# IndoMeds USA
MexiMeds Express: mexico drug stores pharmacies – mexican online pharmacies prescription drugs
online pharmacy nolvadex MediSmart Pharmacy boots pharmacy propecia
mirgeal bustine: OrdinaSalute – fucicort crema prezzo amazon
прибор узи https://www.kupit-uzi-apparat10.ru .
https://pharmadirecte.shop/# bioderma crealine ar
riopan compresse: OrdinaSalute – cefodox sciroppo
http://pharmadirecte.com/# prix nicopatch 21 mg
protopic 0 1 vendita online farmacia pianesi farmacia sicura online
купить аппарат узи цены новый https://kupit-uzi-apparat15.ru/ .
daga integratore: OrdinaSalute – olanzapina 10 mg prezzo
http://clinicagaleno.com/# farmacia online sterillium
pharmacie pilule sans ordonnance: dГ©livrance fosfomycine sans ordonnance – spedra 200 mg gГ©nГ©rique
rifadin 300 prezzo zhekort spray nasale zodon soluzione orale
масляные трансформаторы купить http://maslyanie-transformatory-kupit1.ru .
http://ordinasalute.com/# neodidro 0 266 mg prezzo
comprar ibuprofeno 600 sin receta: melhor farmacia online para comprar – farmacia online minoxidil 5
http://ordinasalute.com/# plavix 75 prezzo
farmacia espaГ±ola online internacional Clinica Galeno farmacia estudiar online
https://pharmadirecte.shop/# médicament pour bander sans ordonnance en pharmacie
avamys spray nasale prezzo: OrdinaSalute – dicloreum 150 mg prezzo
каталог трансформаторов каталог трансформаторов .
xanax a rilascio prolungato imigran 100 mg compresse prezzo lansox orosolubile
https://pharmadirecte.com/# quel antibiotique pour chat sans ordonnance
farmacia 4 estaciones online opiniones: Clinica Galeno – the ordinary farmacia online
https://clinicagaleno.com/# farmacia online app
comprar clomid sin receta Clinica Galeno farmacia online numan
https://clinicagaleno.com/# comprar fosfomicina sin receta
доставка воды на дачу http://dostavka-tehnicheskoi-vodi.ru/ .
ставки на спорт прогнозы на спорт http://www.stavki-na-sport-prognozy.ru .
farmacia online xenical: Clinica Galeno – farmaciasdirect.com farmacia online y parafarmacia online sevilla
pantorc 20 mg prezzo senza ricetta [url=http://ordinasalute.com/#]OrdinaSalute[/url] voltaren 75 mg
http://ordinasalute.com/# prezzo riopan bustine
tadalafil gГ©nГ©rique prix: PharmaDirecte – paraetpharmacie.com avis
https://ordinasalute.com/# augmentin prezzo
lactase pharmacie sans ordonnance medicament pour abces dentaire sans ordonnance sachet pour infection urinaire avec ordonnance
https://clinicagaleno.shop/# farmacia online mieres
https://snabbapoteket.com/# katt vitlök
apotek med snabb leverans: SnabbApoteket – apotek djurrecept
medicijn bestellen apotheek Medicijn Punt digitale apotheek
bГ¤st multivitamin: Snabb Apoteket – ultraljudsgel apotek
https://tryggmed.com/# natriumklorid apotek
sök läkemedel massageolja apotek urinvägsinfektion engelska
https://tryggmed.com/# apotek covid test
medicijnen zonder recept: Medicijn Punt – medicijn online
прогнозы на спорт от профессионалов точные бесплатно http://prognozy-na-sport-1.ru/ .
hГҐrnett apotek TryggMed hva koster influensavaksine pГҐ apotek
https://tryggmed.com/# tannkrem apotek
https://snabbapoteket.shop/# svinkoppor bilder
netherlands pharmacy online: apotheek medicijnen – dutch apotheek
экспресс прогнозы на спорт экспресс прогнозы на спорт .
жб прогнозы http://prognozy-na-sport-3.ru .
https://snabbapoteket.com/# apotek snabbast leverans
online apotheken online pharmacy medicatie aanvragen
nieuwe pharma: mijn medicijnkosten – medicijen
http://zorgpakket.com/# online apotheken
apotheek recept Medicijn Punt internetapotheek nederland
http://snabbapoteket.com/# beställa recept på nätet
knipkulor apotek: apotek aktier – apotek.
https://snabbapoteket.com/# lansett apotek
оценка элитных часов http://www.ocenka-chasov-onlajn8.ru .
medicijnen bestellen zonder recept betrouwbare online apotheek zonder recept apteka den haag
online apotheek – gratis verzending: MedicijnPunt – apothekers
https://indiamedshub.shop/# IndiaMedsHub
MediMexicoRx mexico pharmacy mexico pharmacy
https://expresscarerx.org/# provigil internet pharmacy
prescription cialis online pharmacy: ExpressCareRx – domperidone mexican pharmacy
http://indiamedshub.com/# india online pharmacy
humana pharmacy rx direct rx pharmacy pharmacy to buy viagra
longs pharmacy store locator: pharmacy cialis online – ExpressCareRx
https://indiamedshub.shop/# india pharmacy mail order
indian pharmacy: IndiaMedsHub – reputable indian online pharmacy
buy antibiotics from mexico MediMexicoRx prescription drugs mexico pharmacy
https://indiamedshub.shop/# top online pharmacy india
MediMexicoRx: MediMexicoRx – safe mexican online pharmacy
pharmacy website india indian pharmacy paypal top online pharmacy india
https://indiamedshub.shop/# top 10 pharmacies in india
техническая вода спб http://www.dostavka-tehnicheskoi-vodi.ru .
ExpressCareRx: ExpressCareRx – online pharmacy indomethacin
https://medimexicorx.shop/# reputable mexican pharmacies online
изготовление металлических лестниц изготовление металлических лестниц .
mental health app mental health app .
fair go australia pokies, does canada have slot machines and best play Double exposure blackjack Online free casino canada no deposit
bonus, or native united statesn casinos in montana
independent online casino usa, blackjack online casino australia and canadian casino sign up no deposit bonus, or australian poker tournaments
Feel free to surf to my homepage … Margarito
водопонижение скважинами водопонижение скважинами .
вакуумное водопонижение иглофильтрами http://www.vodoponizhenie-msk.ru .
prescription-free Modafinil alternatives: nootropic Modafinil shipped to USA – affordable Modafinil for cognitive enhancement
NeuroRelief Rx where to get gabapentin how much gabapentin can you take in a day
ClearMeds Direct: Clear Meds Direct – amoxacillian without a percription
http://clomidhubpharmacy.com/# generic clomid no prescription
generic prednisone pills: Relief Meds USA – ReliefMeds USA
gabapentin veterinary dogs NeuroRelief Rx NeuroRelief Rx
Relief Meds USA: prednisone 50 mg for sale – prednisone uk buy
большая холодильная камера xn—-7sbarc2alevbr6d.xn--p1ai .
прогнозы на спорт на сегодня бесплатно prognoz-na-segodnya-na-sport9.ru .
1с купить программу [url=kupit-1s22.ru]1с купить программу[/url] .
прогнозы на спорт с аналитикой http://prognoz-na-segodnya-na-sport9.ru .
candy casino candy-casino-7.com .
MexiCare Rx Hub: MexiCare Rx Hub – buying from online mexican pharmacy
best online pharmacy india indian pharmacies safe IndiGenix Pharmacy
slot giri? http://candy-casino-10.com .
casinocandy candy-casino-4.com .
candy casino candy casino .
safe place to buy semaglutide online mexico: MexiCare Rx Hub – isotretinoin from mexico
888starz tanzania [url=https://888starz.fans]https://888starz.fans[/url] .
MexiCare Rx Hub: buy antibiotics over the counter in mexico – MexiCare Rx Hub
maple leaf pharmacy in canada CanadRx Nexus CanadRx Nexus
CanadRx Nexus: reliable canadian pharmacy – canadian drugs online
http://canadrxnexus.com/# northern pharmacy canada
slot giri? http://www.candy-casino-7.com .
купить гидромассажную ванну в москве недорого hidromassazhnaya-vanna2.ru .
винлайн фрибеты за регистрацию https://winline-fribet-novym-klientam.ru/ .
gessi продукция http://www.gessi-santehnika-3.ru .
prescription drugs mexico pharmacy: MexiCare Rx Hub – MexiCare Rx Hub
CanadRx Nexus: online pharmacy canada – canada drug pharmacy
почему нет фрибета винлайн почему нет фрибета винлайн .
винлайн бонус за регистрацию 2025 https://winline-fribet-za-registraciyu-2025.ru/ .
IndiGenix Pharmacy: IndiGenix Pharmacy – IndiGenix Pharmacy
IndiGenix Pharmacy: cheapest online pharmacy india – IndiGenix Pharmacy
CanadRx Nexus legitimate canadian pharmacies CanadRx Nexus
винлайн фрибеты 2025 winlayne-fribet.ru .
винлайн дает бонусы винлайн дает бонусы .
акции винлайн на сегодня на фрибеты https://winline-bonus-za-registraciyu-2025.ru/ .
top 10 pharmacies in india: top online pharmacy india – IndiGenix Pharmacy
пк игровой https://www.kupit-igrovoj-kompyuter8.ru .
купить игровой пк купить игровой пк .
IndiGenix Pharmacy: IndiGenix Pharmacy – top 10 pharmacies in india
best india pharmacy: IndiGenix Pharmacy – india pharmacy
finasteride mexico pharmacy buy modafinil from mexico no rx best mexican pharmacy online
почему нет фрибета винлайн почему нет фрибета винлайн .
https://canadrxnexus.com/# northwest canadian pharmacy
заказать трансляцию мероприятия https://zakazat-onlajn-translyaciyu7.ru .
купить игровой компьютер в москве купить игровой компьютер в москве .
MexiCare Rx Hub: MexiCare Rx Hub – MexiCare Rx Hub
онлайн трансляция под ключ онлайн трансляция под ключ .
видео трансляция заказать http://zakazat-onlajn-translyaciyu6.ru .
https://canadrxnexus.com/# CanadRx Nexus
best online pharmacies in mexico: MexiCare Rx Hub – buying prescription drugs in mexico
кашпо стиль кашпо стиль .
ivermectin 0.5 lotion india: IverCare Pharmacy – how to take ivermectin
prescription-free muscle relaxants trusted pharmacy Zanaflex USA RelaxMeds USA
рулонные шторы купить москва недорого http://www.rulonnye-shtory-s-elektroprivodom90.ru .
рулонные шторы с электроприводом на окна https://rulonnye-shtory-s-elektroprivodom17.ru/ .
IverCare Pharmacy: where can i get ivermectin for guinea pig – ivermectin cost
buy ventolin inhalers online: AsthmaFree Pharmacy – how to get ventolin over the counter
рольшторы с электроприводом рольшторы с электроприводом .
электрокарниз двухрядный цена http://www.elektrokarnizy150.ru .
карнизы для штор купить в москве http://elektrokarniz150.ru .
ventolin in usa AsthmaFree Pharmacy AsthmaFree Pharmacy
1с бухгалтерия проф цена 1с бухгалтерия проф цена .
пк игровой https://kupit-igrovoj-kompyuter10.ru/ .
http://ivercarepharmacy.com/# IverCare Pharmacy
IverCare Pharmacy: IverCare Pharmacy – ivermectin tablets dosage
RelaxMeds USA: relief from muscle spasms online – RelaxMeds USA
FluidCare Pharmacy FluidCare Pharmacy lasix furosemide
организация онлайн трансляций цена zakazat-onlajn-translyaciyu7.ru .
автоматические рулонные шторы автоматические рулонные шторы .
cheap muscle relaxer online USA: prescription-free muscle relaxants – muscle relaxants online no Rx
semaglutide pill form: AsthmaFree Pharmacy – AsthmaFree Pharmacy
furosemide 100 mg: FluidCare Pharmacy – lasix dosage
Автозакон avtozakon.online .
ventolin online: generic ventolin inhaler – AsthmaFree Pharmacy
AsthmaFree Pharmacy: AsthmaFree Pharmacy – mounjaro vs rybelsus
Автозакон http://avtozakon.online/ .
автоматические гардины для штор http://www.elektrokarniz150.ru .
интересные кашпо для цветов интересные кашпо для цветов .
pamyatniki-kultury.ru pamyatniki-kultury.ru .
pamyatniki-kultury.ru http://pamyatniki-kultury.ru/ .
оригинальное кашпо оригинальное кашпо .
jollibet login Online casino Jollibet Philippines Jollibet online sabong
Withdraw cepat Beta138: Link alternatif Beta138 – Link alternatif Beta138
Abutogel: Link alternatif Abutogel – Bandar togel resmi Indonesia
https://swertewin.life/# Swerte99 online gaming Pilipinas
Bonus new member 100% Beta138: Login Beta138 – Bonus new member 100% Beta138
Slot jackpot terbesar Indonesia: Live casino Mandiribet – Situs judi online terpercaya Indonesia
Abutogel Abutogel Link alternatif Abutogel
Etibarl? onlayn kazino Az?rbaycanda: Yeni az?rbaycan kazino sayt? – Yeni az?rbaycan kazino sayt?
Casino online GK88: Khuy?n mai GK88 – Link vao GK88 m?i nh?t
jollibet casino: jollibet app – Jollibet online sabong
Jiliko casino: Jiliko slots – Jiliko login
jilwin Jiliko maglaro ng Jiliko online sa Pilipinas
Slot oyunlar? Pinco-da: Pinco il? real pul qazan – Etibarl? onlayn kazino Az?rbaycanda
https://mandiwinindo.site/# Judi online deposit pulsa
интересные горшки для цветов интересные горшки для цветов .
проект перепланировки жилого помещения http://www.proekt-pereplanirovki-kvartiry4.ru .
проект перепланировки цена proekt-pereplanirovki-kvartiry4.ru .
проектирование перепланировки в квартире proekt-pereplanirovki-kvartiry4.ru .
активные ваучеры 1win [url=1win1162.ru]активные ваучеры 1win[/url]
стильные горшки https://dizaynerskie-kashpo-nsk.ru/ .
safe mexican online pharmacy buy modafinil from mexico no rx prescription drugs mexico pharmacy
Indian Meds One: buy prescription drugs from india – Indian Meds One
гидроизоляция цена http://gidroizolyaciya-cena-1.ru .
электрические жалюзи с дистанционным управлением купить elektricheskie-zhalyuzi.ru .
гидроизоляция цена http://gidroizolyaciya-cena-3.ru .
гидроизоляция цена https://gidroizolyaciya-cena-2.ru/ .
indian pharmacy online: pharmacy website india – india online pharmacy
https://medidirectusa.com/# MediDirect USA
top online pharmacy india: Indian Meds One – indian pharmacy online
gabapentin mexican pharmacy: rybelsus from mexican pharmacy – prescription drugs mexico pharmacy
Indian Meds One Indian Meds One Indian Meds One
самополивающийся цветочный горшок https://kashpo-s-avtopolivom-kazan.ru .
Indian Meds One: mail order pharmacy india – top online pharmacy india
купить школьный аттестат за 11 классов отзывы купить школьный аттестат за 11 классов отзывы .
купить проведенный диплом весь купить проведенный диплом весь .
купить аттестат за 11 класс вечерней школы http://www.arus-diplom9.ru – купить аттестат за 11 класс вечерней школы .
аттестат купить 11 кл дипломы тумен кипятком аттестат купить 11 кл дипломы тумен кипятком .
купить аттестат за 11 классов в иркутске купить аттестат за 11 классов в иркутске .
купить свидетельство о разводе украина http://www.educ-ua5.ru .
купить диплом о высшем образовании цена харьков купить диплом о высшем образовании цена харьков .
Mexican Pharmacy Hub: Mexican Pharmacy Hub – Mexican Pharmacy Hub
купить диплом с занесением в реестр челябинск купить диплом с занесением в реестр челябинск .
купить проведенный диплом купить проведенный диплом .
sportandbets sportbets31.ru .
sport bets sportbets30.ru .
sportandbets http://www.sportbets32.ru .
новости спорта футбол http://novosti-sporta-1.ru/ .
новости спорта футбол novosti-sporta-2.ru .
купить привод somfy http://www.avtomatika-somfy.ru .
https://indianmedsone.com/# п»їlegitimate online pharmacies india
Mexican Pharmacy Hub buy antibiotics over the counter in mexico Mexican Pharmacy Hub
trusted mexico pharmacy with US shipping: online mexico pharmacy USA – Mexican Pharmacy Hub
buy propecia mexico: Mexican Pharmacy Hub – legit mexico pharmacy shipping to USA
диплом с проведением купить диплом с проведением купить .
диплом купить в реестре диплом купить в реестре .
купить аттестат за 10 11 класс цена купить аттестат за 10 11 класс цена .
купить аттестат за 11 класс с занесением в реестр купить аттестат за 11 класс с занесением в реестр .
купить корочки для аттестата за 11 класс купить корочки для аттестата за 11 класс .
Мы предлагаем документы институтов, расположенных в любом регионе Российской Федерации. Купить диплом университета:
купить аттестат за 11 классов в новосибирске
купить аттестат за 11 классов в новосибирске https://arus-diplom22.ru .
купить диплом о средне специальном образовании реестр купить диплом о средне специальном образовании реестр .
купить электрические рулонные шторы https://elektricheskie-zhalyuzi.ru .
Mexican Pharmacy Hub: Mexican Pharmacy Hub – Mexican Pharmacy Hub
новости спорта сегодня novosti-sporta-3.ru .
новости спорта сегодня http://www.novosti-sporta-2.ru/ .
прогнозы на спорт от капперов https://www.prognozy-ot-professionalov.ru .
mail order pharmacy india: indian pharmacy online – Indian Meds One
Приобрести диплом под заказ в Москве возможно используя официальный портал компании. kharkov-balka.com/member.php?u=5538
купить аттестат за 11 класс с занесением в http://www.arus-diplom21.ru .
tadalafil how long to take effect: usa peptides tadalafil – Tadalify
спортивные новости https://novosti-sporta-2.ru .
Kamagra oral jelly USA availability Online sources for Kamagra in the United States ED treatment without doctor visits
Tadalify: Tadalify – teva generic cialis
новости спорта футбол novosti-sporta-1.ru .
somfy somfy .
дизайнерские кашпо для цветов напольные http://www.dizaynerskie-kashpo-rnd.ru .
SildenaPeak: SildenaPeak – SildenaPeak
https://sildenapeak.com/# SildenaPeak
Fast-acting ED solution with discreet packaging: KamaMeds – Compare Kamagra with branded alternatives
компьютерные прогнозы на футбол компьютерные прогнозы на футбол .
Мы можем предложить документы университетов, которые находятся в любом регионе РФ. Купить диплом университета:
где купить аттестаты за 11 класс в санкт петербурге
футбол аналитика прогнозы спорт https://kompyuternye-prognozy-na-futbol13.ru/ .
умный горшок для растений умный горшок для растений .
Safe access to generic ED medication: Kamagra reviews from US customers – Sildenafil oral jelly fast absorption effect
новости спорта россии novosti-sporta-12.ru .
купить диплом в архангельске с занесением в реестр купить диплом в архангельске с занесением в реестр .
ставки прогнозы http://www.stavki-prognozy-2.ru .
умный горшок для цветов умный горшок для цветов .
Kamagra oral jelly USA availability: Men’s sexual health solutions online – Compare Kamagra with branded alternatives
stavkiprognozy stavki-prognozy-1.ru .
купить диплом института киев купить диплом института киев .
cialis for bph Tadalify cialis side effects with alcohol
Мы готовы предложить документы институтов, расположенных на территории всей России. Купить диплом ВУЗа:
где купить аттестат за 11 классов в красноярске
Men’s sexual health solutions online: Fast-acting ED solution with discreet packaging – Safe access to generic ED medication
SildenaPeak: SildenaPeak – pharmacy viagra canada
купить аттестат о 11 классах купить аттестат о 11 классах .
купить аттестаты за 11 класс с егэ купить аттестаты за 11 класс с егэ .
Men’s sexual health solutions online: Safe access to generic ED medication – Safe access to generic ED medication
купить аттестат 11 классов в москве купить аттестат 11 классов в москве .
диплом купить с занесением в реестр рязань https://arus-diplom34.ru/ .
купить диплом о высшем образовании с занесением в реестр купить диплом о высшем образовании с занесением в реестр .
точный прогноз на спорт prognozy-na-sport-8.ru .
горшок с автополивом купить горшок с автополивом купить .
кашпо напольное уличное кашпо напольное уличное .
купить диплом ссср высшее купить диплом ссср высшее .
cialis farmacia senza ricetta: viagra generico a basso costo – viagra prezzo farmacia 2023
https://pillolesubito.shop/# Farmacie online sicure
Мы готовы предложить дипломы любой профессии по разумным тарифам. Приобретение диплома, подтверждающего окончание института, – это грамотное решение. Заказать диплом о высшем образовании: webnewsrealty.ru/kupit-diplom-byistro-anonimno-nadezhno
купить аттестат за 11 класс тюмень купить аттестат за 11 класс тюмень .
купить диплом украины цена купить диплом украины цена .
farmacia online senza ricetta: consegna rapida in tutta Italia – Farmacia online piГ№ conveniente
купить аттестат 11 классов хабаровск купить аттестат 11 классов хабаровск .
Farmacia online piГ№ conveniente medicinali senza prescrizione medica farmacia online
диплом о среднем образовании купить легально http://www.arus-diplom34.ru/ .
купить диплом без внесения в реестр купить диплом без внесения в реестр .
Откройте для себя мир азартных игр на [url=https://888starz2.ru]888starz казино россия[/url].
позволяющая пользователям наслаждаться азартными играми в удобном формате. На сайте можно найти различные игры, включая слоты и настольные игры.
888starz предлагает удобный интерфейс, что облегчает процесс игры. Каждый пользователь может найти нужный раздел без труда.
Процесс создания аккаунта на 888starz не займет много времени. Чтобы создать аккаунт, достаточно заполнить небольшую анкету и подтвердить свои данные.
888starz радует своих игроков щедрыми бонусами и многочисленными акциями. За счет бонусов пользователи могут увеличить свои шансы на выигрыш и продлить время игры.
купить итальянскую сантехнику купить итальянскую сантехнику .
купить диплом легальный о высшем образовании arus-diplom32.ru .
Мы готовы предложить документы учебных заведений, которые находятся на территории всей России. Купить диплом любого университета:
купить аттестат за 10 11 класс
acquistare farmaci senza ricetta: Pillole Subito – migliori farmacie online 2024
гидромассажная ванна цена гидромассажная ванна цена .
купить диплом стоимость купить диплом стоимость .
купить аттестат за 11 класс вечерней школы https://www.arus-diplom9.ru – купить аттестат за 11 класс вечерней школы .
farmacie online affidabili: tadalafil senza ricetta – Farmacia online miglior prezzo
купить аттестат 11 классов с занесением в реестр http://www.arus-diplom25.ru .
уличное кашпо для цветов напольное уличное кашпо для цветов напольное .
ванна гидромассажная купить vanna-s-gidromassazhem.ru .
mexican pharmaceuticals online: BorderMeds Express – best online pharmacies in mexico
оригинальный аттестат за 11 класс купить http://www.arus-diplom24.ru/ .
buy propecia mexico: BorderMeds Express – BorderMeds Express
купить диплом в чернигове educ-ua2.ru .
Приобрести диплом ВУЗа!
Наша компания предлагаетбыстро приобрести диплом, который выполнен на оригинальной бумаге и заверен мокрыми печатями, водяными знаками, подписями официальных лиц. Диплом способен пройти лубую проверку, даже с применением профессиональных приборов. Достигайте своих целей максимально быстро с нашим сервисом- customerscomm.com/read-blog/54124_diplom-kupit-moskva.html
BharatMeds Direct BharatMeds Direct BharatMeds Direct
диплом купить реестр диплом купить реестр .
Мы готовы предложить документы любых учебных заведений, расположенных на территории всей РФ. Приобрести диплом ВУЗа:
корочка для аттестата 11 класс купить
Заказать диплом любого института!
Мы изготавливаем дипломы любой профессии по невысоким тарифам— pr0.ru
купить диплом о высшем образовании с занесением в реестр купить диплом о высшем образовании с занесением в реестр .
построить дом под ключ иркутск http://stroitelstvo-domov-irkutsk-6.ru .
построить дом построить дом .
inderal pharmacy: MapleMeds Direct – MapleMeds Direct
кашпо для цветов напольное кашпо для цветов напольное .
pharmacy website india: world pharmacy india – buy prescription drugs from india
частные наркологические клиники в москве narkologicheskaya-klinika-11.ru .
BharatMeds Direct: BharatMeds Direct – BharatMeds Direct
BharatMeds Direct BharatMeds Direct india online pharmacy
купить приложение к аттестату 11 класс купить приложение к аттестату 11 класс .
купить аттестат за 11 класс дешево купить аттестат за 11 класс дешево .
дипломы бывшего ссср купить дипломы бывшего ссср купить .
BorderMeds Express: order from mexican pharmacy online – BorderMeds Express
BorderMeds Express: BorderMeds Express – online mexico pharmacy USA
Купить диплом университета!
Наши специалисты предлагаютвыгодно и быстро купить диплом, который выполнен на оригинальном бланке и заверен мокрыми печатями, штампами, подписями. Диплом способен пройти любые проверки, даже при использовании специального оборудования. Достигайте своих целей быстро и просто с нашим сервисом- te.legra.ph/Zakazat-diplom-bez-prohozhdeniya-obucheniya-08-11-2
купить аттестат 11 классов иркутск купить аттестат 11 классов иркутск .
купить аттестат за 10 11 класс цена купить аттестат за 10 11 класс цена .
строительство дома под ключ иркутск stroitelstvo-domov-irkutsk-1.ru .
купить диплом с занесением в реестр чита http://www.zpu-journal.ru/forum/view_profile.php?UID=328155 .
стационар наркологический http://narkologicheskaya-klinika-13.ru/ .
mail order pharmacy india: BharatMeds Direct – online pharmacy india
купить диплом техникума купить диплом техникума .
daftar garuda888 mudah dan cepat daftar garuda888 mudah dan cepat link alternatif garuda888 terbaru
preman69 situs judi online 24 jam: preman69 – preman69 situs judi online 24 jam
giocare a Starburst gratis senza registrazione: Starburst slot online Italia – bonus di benvenuto per Starburst
купить аттестаты за 11 классов в москве http://www.arus-diplom9.ru – купить аттестаты за 11 классов в москве .
где купить аттестат за 11 класс 2016 где купить аттестат за 11 класс 2016 .
я купил проведенный диплом я купил проведенный диплом .
https://1wbona.shop/# bonaslot jackpot harian jutaan rupiah
купить аттестат за 11 класс в иркутске http://arus-diplom25.ru/ .
клиника вывод из запоя https://narkologicheskaya-klinika-12.ru .
купить диплом о средне специальном образовании реестр купить диплом о средне специальном образовании реестр .
где можно купить диплом где можно купить диплом .
giocare da mobile a Starburst: Starburst giri gratis senza deposito – casino online sicuri con Starburst
где можно купить аттестаты 11 класса в онеге где можно купить аттестаты 11 класса в онеге .
giocare da mobile a Starburst: starburst – casino online sicuri con Starburst
garuda888 link alternatif garuda888 terbaru garuda888 live casino Indonesia